TL;DR: This tutorial walks you through the five essential PDF operations—merging, splitting, converting to Markdown, converting to images, and summarizing with AI—using a browser-based tool that processes files locally on your device. You do not need to install software, create an account, or upload files to a server. All processing happens inside your browser tab, which means your documents never leave your computer [K3].
What You Will Need
- A modern web browser (Chrome, Firefox, Edge, or Safari—latest version recommended).
- The PDF file(s) you want to work with (up to 100 MB on the Pro plan) [K5].
- An internet connection (required only to load the web app; not required for file processing).
- Optional: An OpenAI-compatible API key if you want to use the Summarize or Translate AI features [K1].
- Access to OctopusPDF (no sign-up required) [K3].
Step-by-Step Instructions
Step 1. Open OctopusPDF in Your Browser
Navigate to https://octopuspdf.com in your web browser. The homepage displays a grid of 14 PDF tools [K2]. You do not need to register or provide an email address. The entire application loads as a client-side web app, meaning the code runs in your browser and not on a remote server.
[Insert screenshot: OctopusPDF homepage showing the tool grid]
Step 2. Merge Two or More PDFs
- Click the Merge PDF tool from the grid.
- Drag and drop two or more PDF files into the drop zone. You can also click the drop zone to open your file browser and select multiple files.
- The files appear in a list. Drag them to reorder if you need a different sequence.
- Click the Merge button.
- Your browser downloads the merged PDF automatically. The processing took place entirely in your browser using the pdf-lib library [K3].
Watch out: If you open a PDF directly from an email client, save it to your local disk first. Some email preview panes lock the file, which can cause the upload to fail silently.
[Insert screenshot: Merge tool with two files dropped in and the Merge button visible]
Step 3. Split a PDF into Separate Pages
- Click the Split PDF tool from the homepage grid.
- Upload the PDF you want to split by dragging it into the drop zone.
- The tool shows a preview of the first page and a numeric field labeled Split after page.
- Type the page number where you want the split to occur. For example, entering "5" produces two PDFs: pages 1–5 and page 6 onward.
- Click Split.
- Your browser downloads each resulting PDF as a separate file.
Watch out: The split number is the page order in the document, not the printed page number. If your PDF has a cover page with no number visible, the first "page" is still page 1.
[Insert screenshot: Split tool with the number field highlighted]
Step 4. Convert a PDF to Markdown
- Click the PDF to Markdown tool from the homepage grid.
- Upload your PDF file.
- The tool runs a structure-aware extraction process [K2]. This means it preserves headings, lists, and paragraph breaks rather than dumping raw text.
- Click Convert to Markdown.
- Your browser downloads a
.mdfile. - Open the Markdown file in any text editor to verify the structure.
Watch out: Scanned PDFs (image-only pages) will not extract text because there is no text layer. This tool reads the text layer; it does not perform optical character recognition (OCR).
[Insert screenshot: PDF to Markdown converter with a sample file loaded]
Step 5. Convert a PDF to Images (PNG or JPG)
- Click the PDF to Images tool from the grid.
- Upload the PDF file.
- Choose the output format: PNG or JPG.
- Set the resolution. The tool supports up to 216 DPI [K2]. For on-screen viewing, 72–150 DPI is usually sufficient. For print, use 216 DPI.
- Click Convert.
- The tool downloads a ZIP file containing one image per page.
Watch out: A 100-page PDF at 216 DPI will produce 100 large image files. This can take a moment to download and may eat up disk space. Consider using a lower DPI for large documents.
[Insert screenshot: PDF to Images tool with format dropdown open]
Step 6. Create a PDF from Images
- Click the Images to PDF tool from the grid.
- Drag and drop one or more JPG or PNG images into the drop zone.
- Reorder the images by dragging them in the list. Each image becomes one PDF page [K2].
- Click Create PDF.
- Your browser downloads the combined PDF.
- Important: The tool automatically strips source metadata, including camera EXIF data, location, and software fingerprints [K4]. You do not need to do anything for this; it happens by default.
Watch out: Do not confuse this with the Merge PDF tool. Merge combines existing PDF files. Images to PDF accepts raster images and assembles them into a new PDF with one image per page [K4].
[Insert screenshot: Images to PDF with multiple images queued]

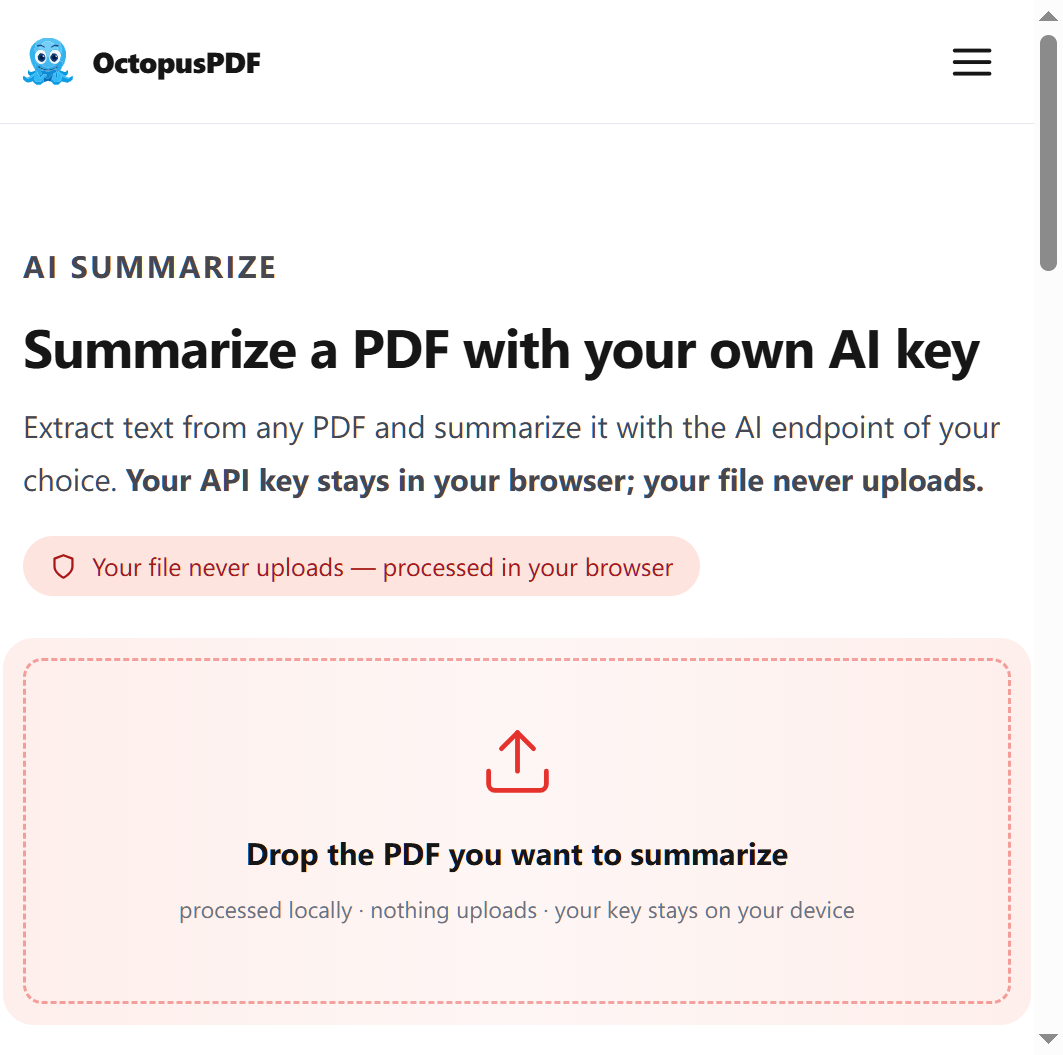
Step 7. Summarize a PDF with AI (Bring Your Own Key)
- Click the Summarize PDF tool from the grid.
- Upload the PDF file. It will be parsed inside your browser with pdf.js; the file never uploads to a server [K1].
- When prompted, enter your OpenAI-compatible API key. The key is stored only in your browser's localStorage. The backend does not make any API call that receives your key [K1].
- Select the summary length (short, medium, or long, depending on the available dropdown in your version).
- Click Summarize.
- The browser connects directly to the OpenAI-compatible endpoint you entered. No server sits in the middle; OctopusPDF does not proxy the request [K1].
- Read the summary, then click Copy or download the result if you want to save it.
Watch out: If you are on a shared computer, clear your browser's localStorage after use so your API key does not remain stored on the device [K1].
[Insert screenshot: Summarize PDF tool with API key field visible]
Step 8. Translate a PDF with AI (Per-Page Translation)
- Click the Translate PDF tool from the grid.
- Upload your PDF.
- Enter your OpenAI-compatible API key. As with Summarize, the key stays in your browser's localStorage.
- Choose the target language. The tool supports 9+ languages [K2].
- Click Translate.
- The tool performs page-by-page translation, producing a translated PDF for download.
Watch out: Translation quality depends on the OpenAI-compatible model you connect to. If the output looks odd, verify your endpoint URL and model name.
[Insert screenshot: Translate PDF tool showing language selection]
Common Mistakes / Troubleshooting
| Problem | Likely Cause | Fix |
|---|---|---|
| The file won't upload | File is larger than the plan limit (100 MB on Pro) [K5] | Compress the PDF first or upgrade your plan. |
| PDF to Markdown produces empty text | The PDF is a scanned image with no text layer | Use OCR software first, or use the PDF to Images tool if you only need visual copies. |
| Merged PDF pages are in the wrong order | Files were dropped in the wrong sequence | Drag the files in the list to reorder before clicking Merge. |
| The AI Summarize tool returns an error | API key is invalid or the endpoint is unreachable | Verify your key and endpoint URL. The browser connects directly to the OpenAI-compatible endpoint [K1]. |
| Images to PDF output is very large | High-resolution source images (e.g., 216 DPI) inflate the file | Re-export your images at a lower resolution before converting. |
| The output PDF contains hidden metadata | Metadata is stripped automatically for Images to PDF [K4], but not for other tools | Use the metadata wipe feature (available in the tool set) before sharing confidential files [K5]. |
How to Verify Success
- Merge: The downloaded file opens and contains all pages you intended, in the correct order.
- Split: You have two separate PDF files that open without errors and contain the expected page ranges.
- PDF to Markdown: The
.mdfile opens in a text editor, shows the same headings and paragraphs as the source PDF, and contains no garbage characters. - PDF to Images: The ZIP file contains one image per page, at the resolution you selected (up to 216 DPI) [K2].
- Images to PDF: The output PDF has one image per page, and the Windows/macOS "Get Info" or "Properties" dialog shows no EXIF or location data for the embedded images [K4].
- Summarize or Translate: The AI output appears in the browser tab, and your API key does not appear in any network requests (you can verify this in browser developer tools) [K1].
FAQ
Q1. Do I really need to create an account to use these tools?
No. OctopusPDF works without sign-up, and there is no watermark on outputs [K3]. The entire pipeline runs in your browser: you drop a file, it opens inside the browser tab, it is processed locally, and you download the result [K3].
Q2. Is it safe to use the AI Summarize tool with sensitive documents?
The architecture is designed so that your PDF is parsed only inside the browser tab using pdf.js, and your API key stays in localStorage [K1]. The browser connects directly to the OpenAI-compatible endpoint you entered; no server is in the middle [K1]. However, note that the AI provider you connect to will receive the text of your document. For confidential documents, consider redacting sensitive sections first or using a self-hosted endpoint.
Q3. What file size limit applies to these tools?
The free plan is limited; the Pro plan supports files up to 100 MB [K5]. If you exceed the limit, compress your PDF before uploading. There is no waiting room and no watermark, regardless of the plan [K3].